 If you want to reorganise the content in the top level of the course, you can click the course name in the navigation tree:
Open topic with navigation (left menu)
When you add content to your courses and projects, the structure may be complex. You may eventually see the need for changing the sequence of some of the elements, or for moving content from one folder to another. Perhaps you have invested a lot of work in a survey that you now want to use in the one of your other courses.
If you need to copy, move, delete, or change the sequence of elements, you can simply use drag-and-drop, or the element management function.
Drag-and-drop is the simplest way of organising a folder. In the navigation tree, simply left-click on the item you want to move, then drag it to the desired location in the tree menu. If you move an element to another folder, you are asked to confirm this action, via a pop-up confirmation dialog box.
If you want to reorganise the content in the top level of the course, you can click the course name in the navigation tree:
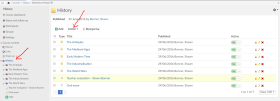
To start the element management, click on the folder or on the name of the course. In the picture to the right you will then get up a list with all elements in the folder, or, as the case may be, on the top level in the course.
To the right of each element in the list you find three icons:
Use these if you want to work with the elements one by one. If you want to perform operations on several elements at once, first select the elements you want to process by checking the boxes in front of them. Then choose the operation in the menu in the lower left corner. You have the following options:
Use this function if you want to copy the selected elements to another course or project. When you select Action and Copy to, a pop-up appears that allows you to choose from among all your courses and projects. When you have selected a course or project, click on the folder to which you want to copy the elements. Then, once you have selected a folder, click Copy to start the copying.
If you want to include the answers and submissions, such as discussion entries, assignment answers, and test results, check the box in front of '
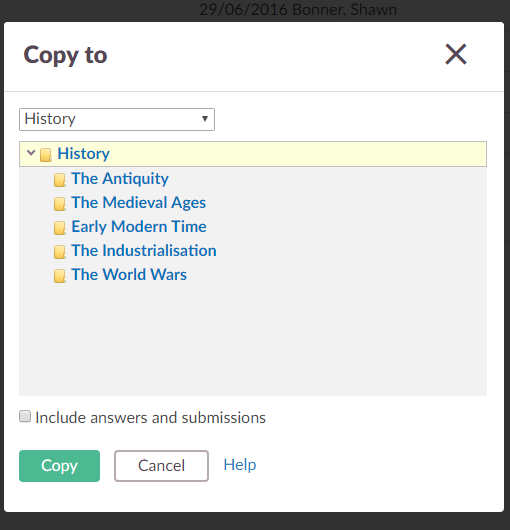
Tip: If you want to copy elements to the top level of the course or project, select the title of the course or project in the menu where you select the folder.
When you copy a file the original file remains at the original location, but when you move a file the file is removed from the original location and transferred to another. The procedure for moving elements is similar to copying.
You can delete multiple elements simultaneously, by selecting them all and choosing Action, thenDelete. This is quicker compared to deleting the elements one by one. When you click OK, a box pops up on the screen and asks you to confirm that you actually want to delete the elements.
The person adding an element automatically becomes the element owner. In order to avoid conflicts, for example, when two users update the same document at the same time, it is necessary to own the element to edit it. This is of particular relevance if there is more than one teacher in a course. You can use element management to take ownership of one or more elements. The elements are then yours, and you can edit them.
Warning: You cannot take ownership over elements where the owner has higher rights than your own, for example, if the owner has full control over the element you can only evaluate and read.
When necessary, you can also export elements to a file. itslearning generates a file package (.zip archive) that can be imported when you add new courses in itslearning. It can also be imported in other learning platforms that support IMS. It may take some time to generate the file package. Be patient, and wait until a message appears on the screen that tells you that you can download it. The advantage of this function is that you can store the content in a course or project locally on your computer, and then import it in other courses or external learning platforms.