Open topic with navigation (left menu)
Before a school can start using the parent feature, a system administrator must:
A system administrator can enable the parent dashboard by following these steps:
In order to use the parent dashboard, all parents must have an itslearning account. The most common approach is to import CSV files with parent users. A synchronisation key is mandatory for automatic connection of the parents and children. Assign parent users to the Parent profile. See the best-practice examples below to avoid the most common mistakes.
CSV file example:
| First name | Last name | User name | Password | Pupil sync key | |
|---|---|---|---|---|---|
| Martha | Archer | martharcher | 43fdjD56F | RGB346 | [email protected] |
| Peter | Johnson | peterjohnson | 65Fgos34a | RGB6323 | [email protected] |
By means of the CSV file above, the parents are automatically connected to their children.
| SyncID | User name | First name | Last name | ChildID |
|---|---|---|---|---|
| 1 | son1 | Jim | Dickinson | |
| 2 | son2 | Johnny | Dean |
| SyncID | User name | First name | Last name | ChildID |
|---|---|---|---|---|
| 222 | mom | Elizabeth | Dickinson | 1 |
| 333 | dad | Robert | Dickinson | 1 |
| SyncID | User name | First name | Last name | ChildID |
|---|---|---|---|---|
| 222 | mom | Elizabeth | Dickinson | 1 |
| 333 | dad | Robert | Dickinson | 1 |
| SyncID | User name | First name | Last name | ChildID |
|---|---|---|---|---|
| 222 | mom | Elizabeth | Dickinson | 2 |
| 333 | dad | Robert | Dickinson | 2 |
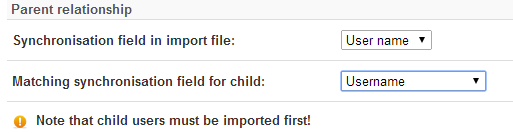
At the bottom of the Import users from file page are two fields under Parent relationship that are important for connecting parent users to the correct children:
Synchronisation field in import file: Here you tell itslearning what field to use when connecting parents to their children - also called synchronising. The alternatives in the drop-down list are retrieved from the CSV file from which you are importing. In the above example, the synchronisation field would be ChildID. In this example, the ChildID value is a number, but it could also have been, for example, the child’s username. Note that the synchronisation field must be unique.
Matching synchronisation field for child: This field must match the selection you have made for Synchronisation field in import file, above, and tells itslearning what kind of field the Synchronisation field in the import file involve. You can select from three alternatives: Internal person ID, Synchronisation key, and Username. If the synchronisation field in the import file contains usernames, select Username as the matching synchronisation field. If you have a SyncID field in your CSV file, then select Synchronisation key.
Administrators can manually connect or remove parents of learners. To connect a parent to a learner:
To remove a parent from a learner, simply click the deletion icon in the Remove column.
There are several ways to distribute user names and passwords. The user names and passwords can be sent automatically to the parent's e-mail address from the Admin interface >> Users and access rights. It is also possible to print the login information and send it by post.