Open topic with navigation (left menu)
A hierarchy in itslearning is the organisational structure of the school. The school itself is at the top of the hierarchy and different classes, the administration and so on can be added as subhierarchies.
When users are added in itslearning, they are added into hierarchies. The advantage of having the different learners grouped into subhierarchies is that groups of learners are easier to work with. Imagine if all the learners in a school were grouped in a large list? It would not be easy to handle school work in such a situation. Below is a suggestion on how to structure a hierarchy at a school:
Chesterson
Chesterson \ Employees
Chesterson \ Teachers
Chesterson \ International
Chesterson \ International \ 2001
Chesterson \ International \ 2002
Chesterson \ International \ 2003
Chesterson \ International \ 2004
And so on. Note that instead of using classes named by year or age, it is a good idea to name classes after, for example, the year it began. This makes it easier to adjust the hierarchy for the next school year without having to change the name of this element in the hierarchy.
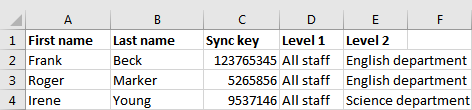
When you add a course you have to add participants to it. If you have a school with several thousand learners, it is tedious to select the learners you want to add to your course from one single list. Instead, if the different classes are divided into sub-hierarchies, a group of learners is easily added to the course. In itslearning, this is called hierarchy synchronisation.
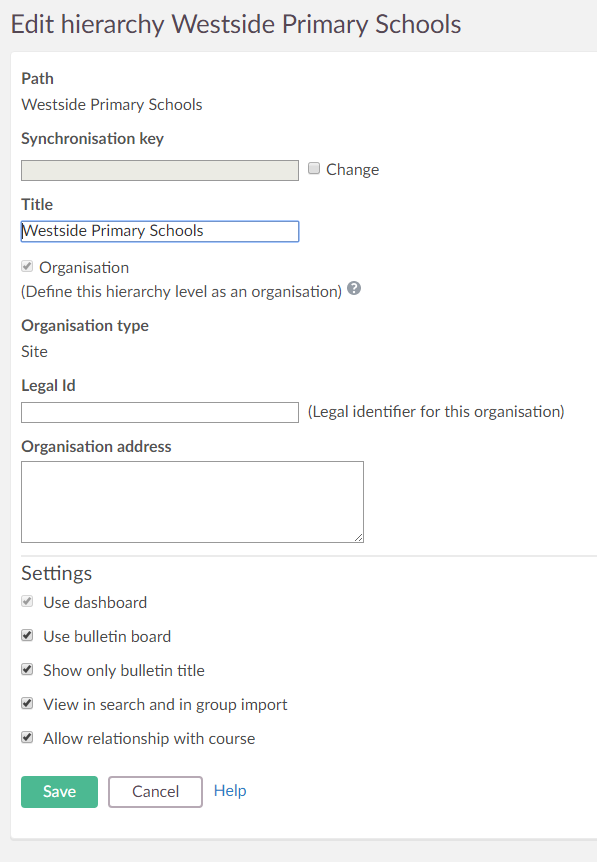
The Hierarchy type setting, under Admin >> Hierarchy >> Add/edit hierarchy, is crucial for making functionality such as privacy, terms, and policies work.
It is important to define the root hierarchy as a Site. You should not add a site under a site. The organisations for which you want to add terms, policies, and privacy rules must be defined as School or Site. The logical rule is as follows: one site, and several schools within that site, but not several schools within a school.
If your site hierarchies are created by external administrative systems, you might see them defined as Class or Group. These are managed by external administrative systems, so it is not possible to change their type manually or set them to refer to an organisation.
Larger schools may have some kind of administrative system that automatically synchronises the user data of the learners with itslearning. Such systems can, in most cases, synchronise to which courses and hierarchical structure the learners belong. The basic structure is created before the school starts a new semester.
There are four roles in a hierarchy: Administrator, Employee, Student and Guest. These roles cannot be changed, and must not be confused with profiles.
The name of a site, as it appears in the header on the main page, can be changed by editing the name of the root hierarchy, or the name at the top of the hierarchy list. See Editing a hierarchy in the How-tos section below. To change the name of the site, edit the Title field:
Each level/group in the hierarchy can be set up with different properties. Note that the nature of a hierarchy demands that some of the sublevels inherit properties from the levels above them.
| Field | Explanation |
|---|---|
| Path | The path to the level you are adding. |
| SyncID | An ID used in synchronisation. |
| Title | The name of the hierarchy level/group, for example, All students, Year groups. |
| Organisation | A unit – most often a school – for which you can add policies, terms and privacy rules. |
| Organisation type | Unclassified, Site, School, Class, or Group. |
| Legal ID | An external identifier that can be used for site agreements and resources. This allows vendors in, for example, Diglib to match site agreements and resources with their own internal IDs. |
| Organisation address | The address of the organisation. The address is used in, for example, automatically generated letters. |
| Use dashboard | Setting to enable a dashboard as a main landing page. |
| Use bulletin board | Setting to enable a bulletin board on the main landing page. |
| Show only bulletin title | If this element in the hierarchy is to have its own bulletin board for news and information, a setting determining whether to show the entire message or just the heading there. If you select the latter, the user must click on the heading in order to view the content. If you want only the heading to show, check this field. |
| View in search and group import | If this box is checked, users linked to this point in the hierarchy are shown, for example, when you use the search function to send a message. It will then be simple to locate these specific users as a group. |
| Allow relationship with course | Links to courses make it possible to retrieve the relevant group when adding users in the course or subject. Changes made in this group are automatically updated in the relevant course or subject. |
 Adding a sub-hierarchy